Overview
There are all sorts of tools to create flow charts, diagrams, etc. Many are drag-and-drop GUI tools. ZenUML is different.
ZenUML will generate a diagram using a very simple declarative domain specific language (DSL). This DSL only has about 5 elements and takes about 5-10 minutes to learn. The whole syntax is available here.
ZenUML is available as an application or plugin in Confluence, a downloadable application, extension in Chrome and Jetbrains, and a free online editor available on the ZenUML website.
This guide covers enough to be very productive with ZenUML, but further functionality is documented on the ZenUML website.
Our Example
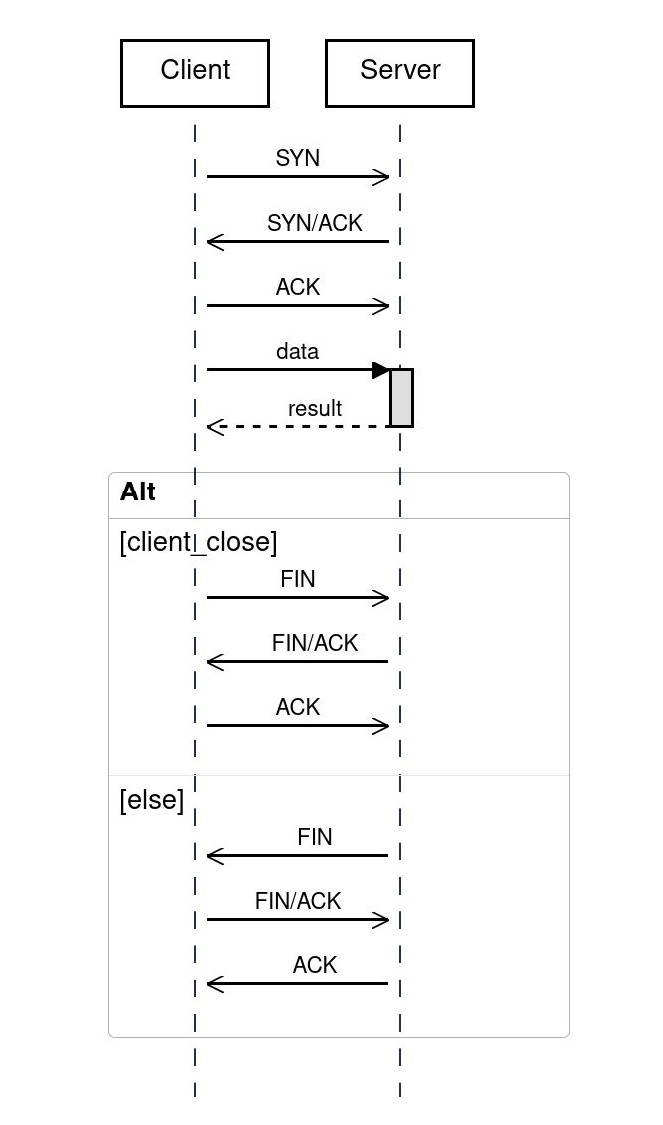
The example shown at the top of this article documents a typical TCP session: creating, then tearing down a TCP connection. It was generated using the ZenUML text shown with the diagram below.

Client
Server

Client->Server:SYN
Server->Client:SYN/ACK
Client->Server:ACK

result = Server.data {

}

if(client_close) {
  Client->Server:FIN
  Server->Client:FIN/ACK
  Client->Server:ACK
} else {
  Server->Client:FIN
  Client->Server:FIN/ACK
  Server->Client:ACK
}
Syntax Elements
The example begins by specifying the participants. This is done by just listing their names.
Client
Server
That’s it! In fact, specifying the participants is optional. They would otherwise be inferred when messages are specified lower down in the diagram.
Although optional, specifying participants can be useful. It lets you define their order. They appear in the same order, left to right, as they appear in the ZenUML text. It is also necessary when specifying the origin of the first synchronous message in a sequence (see below).
Each asynchronous message is specified using the syntax Origin→Destination:message. These messages specify an origin, destination and the name of the message.
Synchronous messages are a little different. The origin of each message is inferred by the destination of the previous item in the sequence.
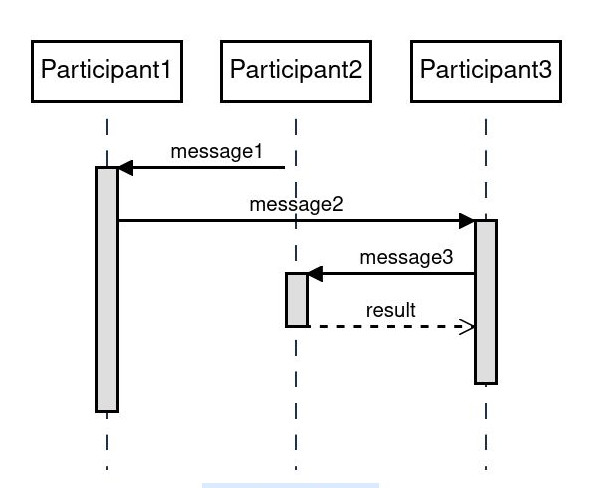
Each synchronous message is specified using result = Destination.message {}. Here result is optional and is the dashed line that returns back to the message’s origin. Multiple messages in a sequence are nested. The origin for each message is the participant at the nesting level above the message. The example below illustrates multiple nested messages.

Participant1
Participant2
Participant3

@starter(Participant2)

Participant1.message1 {
  Participant3.message2 {
    result = Participant2.message3 {

    }
  }
}
You may be about to ask, "how does ZenUML know the origin of the first message?" This is specified using the @Stater() annotation. Here Participant2 will always be the origin for the first synchronous message in a sequence. The starter is specified after defining participants at the beginning of a document but before any messages. Otherwise messages start out to the side of the diagram without an origin.
Finally overlays highlight different loops or denote branching in the sequence. The syntax here is very straightforward and familiar for anyone that has used a C-like language. Loops are specific using any of the following:
while(condition) {}
for(enumerator) {}
forEach(enumerator) {}
Similarly, if-else branching (syntax shown below) can be used to specify alternatives based on conditions. In our example we used an if-else statement to show two alternative sequences based on whether the client or server were the initiators of the final connection termination sequence. The annotation, labelled Alt, separates each alternative.
if (condition) {

} else if (other_condition) {

} else {

}

